I make no effort to hide that breakfast is my favourite meal of the day. I think it has something to do with the sheer variety on offer but mostly I like that breakfast satisfies my sweet tooth: banana bread, muffins, and waffles all blur the line between pudding and breakfast. While this is a relatively new trend to have hit our shores, its one which Americans and majority of our European neighbours have long been enjoying, and I welcome it with open arms. Quite frankly, if I can have pudding at 10am on a Sunday morning and justifiably call it breakfast without heavy irony, I’m on board.
That said, there is a fine between the breakfasts I enjoy eating and those I’m willing to cook at home. The very fact I can’t make a hollandaise sauce means of course, eggs benedict and its assorted variations are firmly off the menu at Maison Weegie. Croissants are another one. I wouldn’t even know where to begin regardless how easy Meryl Streep made it look on her date with Steve Martin in It’s Complicated.
Now, Cinnamon Buns on the hand, yes they don’t exactly scream ‘easy throw-together breakfast’, but I assure you the skill required is actually very minimal. The heavy work is done by the electric mixer and most of the time, the dough is rising in a warm cupboard. So while the they may take 2 hours to make, realistically most of that time is spent curled up enjoying Sunday TV with a coffee.

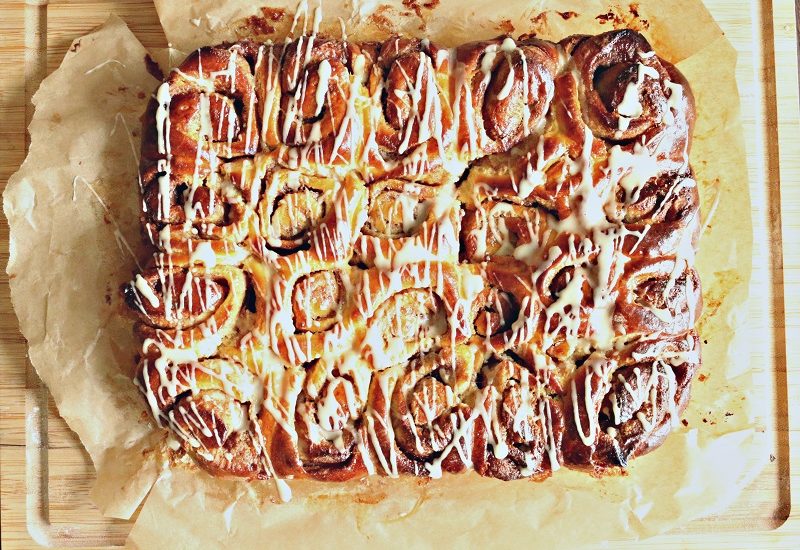
Cinnamon Buns
These are Nigella Lawson’s Norwegian Cinnamon Buns recipe from my now cake-batter-stained, well-thumbed, and unashamed to admit it cooking bible: How To Be A Domestic Goddess. I’ve offered a few tweaks here & there which work for me, but I stay true to her instructions. Consequently, these are one of the strongest tools in my breakfast arsenal. They’re a handy recipe to have up your sleeve for bribery, birthday breakfasts or innocent weekend treats.
If you are short on time, you can prepare and cook these buns the night before and leave to cool in the tin. The following morning, when you walk bleary-eyed into the kitchen, just wrap the tin in tin-foil and warm in the oven at 150C for around 45 mins. There’s no difference in quality, but this option offers you a lie in.

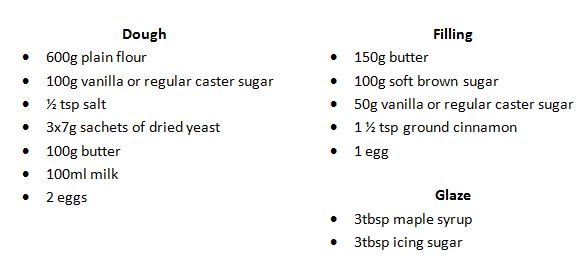
Ingredients

Note on ingredients: Make sure all the ingredients are at room temperature before starting.
Start with melting the butter. Then set it aside to cool while you prepare the baking tin. You’ll need a tin which is approximately 33cm x 24cm (circular or rectangular). Grease the tin with butter, then line the base and sides with 1 large sheet of grease-proof paper. Leave a little overlap.

In a large bowl, combine the dry dough ingredients: plain flour, sugar, salt, and yeast.
In a measuring jug combine the wet dough ingredients: eggs, milk, and (now slightly cooled) melted butter. Whisk to combine.

Pour the wet ingredients into the dry mixture and briefly mix with a spatula until it comes together.

You can knead the dough by hand (for approx 10-15 minutes) or use the dough hooks on an electric mixer (approximately 6 minutes). Bear in mind this is a very wet dough so flour the counter liberally if kneading by hand. Beg, borrow or steal an electric mixer, even a handheld one, cause its a lot less messier.
Oil a large (clean) mixing bowl and plonk the now kneaded dough inside. Cover the bowl with cling-film and leave it someplace warm to rise for 25 minutes. Drape a thick towel over the bowl to insulate it further.
Meanwhile, measure out the filling ingredients: butter, caster sugar, brown sugar, and cinnamon into a bowl. Beat with a wooden spoon or electric whisk until smooth. Set aside until ready to use.
Once the dough has risen, flour the counter liberally and scoop out approximately 1/3 of the dough. Using your hands, stretch the dough to fit the base of the tin. The dough will be very sticky, if it tears just patch it back together. It doesn’t need to be perfect.

Flour the counter again and scoop out the remaining dough. Roll the dough to a rectangular shape roughly 50cm x 50cm.
Spoon the filling mixture onto the rectangle of dough, and spread it evenly, and up to the edges, using a spatula.

Flour your hands, and starting from the longest side, roll the dough into a long sausage shape.

Cut the dough into 2cm slices and place the slices (cut side up) onto the dough lined baking tin. Don’t worry if the buns don’t fit the tin, they will swell up later.

Brush the cinnamon buns with beaten egg. Leave to rise, uncovered, in a warm place for 15 minutes. Meanwhile heat the oven to 190C.

After 15 minutes the buns will have swelled to fit the tin. Bake in the pre-heated oven for 20-25 minutes until golden brown. Once baked, leave to cool for 10 minutes before turning out onto a wire rack. Carefully peel away the grease-proof paper, and leave to cool for a further 5-10 minutes.
You can eat the cinnamon buns as they are, but I personally like the indulgent addition of a sticky maple glaze. Mix together 3 tbsp icing sugar + 3 tbsp maple syrup until it forms a runny paste. Add more icing sugar to make it thicker if needed.
Then using a teaspoon, drizzle the glaze all over the cinnamon buns from a height so it doesn’t pool in 1 area.

So get the coffee on, grab the Sunday papers, stretch out on the sofa and apply several of these to your face. After all, that’s what weekends were made for.

